
See 3D with a stereoscope
We just got a new camera here at Science by Email so we want to play with it and what better way than creating out own three dimensional photo viewer (a stereoscope) – phoaw! A few of the steps are hard to put in words (but easy to do!), so we'd suggest looking at the big pictures as well as the written instructions.
You will need
- Camera (digital is easier but not necessary), and a colour printer or a photo developing shop
- Solid cardboard box that is quite large, around 50 x 50 cm
- 4 small mirrors - two 15 cm square and two 7 cm square (rectangular mirrors are fine too; use these sizes as a rough guide and cut your cardboard to suit)
- Blu-tak
- Ruler
- Pencil
- Sharp craft knife
WARNING: Take care using the craft knife; younger readers should ask an adult to help or do this step.
What to do
- Find your subject – it should be solid, still and something worth looking at. Scout around for both something big like a tree or building, and something small like a vase of flowers or a favourite toy.
- You need two photos of your subject; you are taking one photo for each of your eyes. For a big subject that is far away, take one photo and then take one step to the side and take another. If your subject is smaller and closer, you may only need to sway a little (like 5 cm) to one side to take the second photo.
- Either print or develop your pictures.
- Now make your three dimension viewer. Cut the lid off the box. Make your viewing hole in the box by cutting a 15 x 15 cm square hole in the middle of one side of your box.
- To make the centre mirror piece, cut a 15 x 15 cm square (the square should be a tiny bit bigger than your two small mirrors together) from some extra cardboard (like the lid of the box). Score down the centre and fold along this line so it makes a right angle (scoring is where you drag a knife along a ruler so you cut through just the surface of the cardboard, making it easy to fold).
- To give this a solid base to stand on, cut out a right-angle triangle and stick it on the end of the folded piece of card so the two right angles line up. I used a combination of Blu-tak and sticky tape to do this. You should end up with something that looks like a house roof with one end (see image).
- Stick your small mirrors to the two sides of the folded cardboard so they are touching and at a right angle. Trim off any excess from the base and the whole structure should be able to stand up on its own.
- Place this just inside your viewing hole, at the front of the box, with the mirrors facing the viewer.
- Place the other two mirrors in the front corners of the box, at an angle and facing the back.
- Stick your pictures to the bottom of the back of the box, in the back left corner and one in the back right corner.
- Look through the view finder and fiddle with the mirror angles until the two pictures on the back of the box are overlapping perfectly, and when they do, look closely and you can see a three dimensional picture – amazing!
What's happening?
Even though most of us get to see in three dimensions all the time, the novelty doesn't seem to wear off, and it is still a treat to see pictures that are two dimensional jump out at us through the stereoscope.
It is all about how your eyes see things. Our two eyes see the world from slightly different angles and this gives us depth perception. Place a hand over one eye, and then place it over the other eye - can you see the difference? And while you are at it, notice how it has become difficult to judge distances when you are one-eyed.
Our eyes are about six centimetres apart, and the two images they each see are sent to your brain where they are combined into one three dimensional picture. Each eye sees the world at a different angle and your brain does some clever trigonometry to judge distance.
You took a photo of your subject from slightly different angles, just like your two eyes. You then put these pictures back together by manipulating their reflections with the mirrors, creating a three dimensional image, without your brain having to do any work at all! Two images that form a 3D image are called a stereo pair.
Applications
Aerial photography that allows you to see the landscape as a three dimensional image is extremely valuable. If a plane takes two images at different angles, a stereoscope can then allow you to see the world from above in three dimensions. This is great for land management as it lets you see a photo of hills and valleys and contours. And if you were studying a forest, it's useful to have three dimensional images of the forest canopy to examine its structure from above.
They also make a great toy and have done ever since their invention in the mid 1800s.
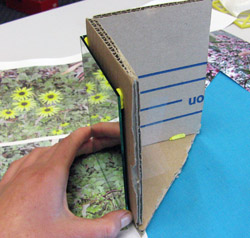
Here is the centrepice mirror for your Stereoscope.
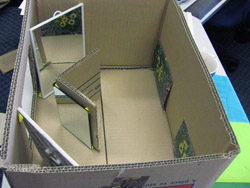
How to set up your stereoscope.
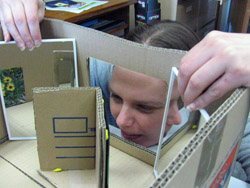
Here is how you use your stereoscope.
You will feel a lot like Alice in Wonderland.
